DIY Composting Made Easy: Gardener’s Tips for Sustainable Waste Management
Composting is one of the most effective ways to reduce household waste while creating nutrient-rich soil for your garden. Whether you’re a seasoned gardener or just starting out, building your own composting system doesn’t require expensive equipment or complicated processes. This comprehensive guide will walk you through everything you need to know about DIY composting, from selecting the right location to harvesting your finished compost.
By starting a composting program at home, you’re not only diverting organic waste from landfills but also reducing your overall environmental footprint. Composting produces methane-free decomposition, unlike landfills where organic matter breaks down anaerobically and releases harmful greenhouse gases. The resulting compost enriches soil, improves water retention, and reduces the need for chemical fertilizers—making it an essential practice for sustainable gardening.
This guide provides practical, actionable advice that will help you establish a thriving compost system in your backyard, balcony, or indoor space. We’ll cover everything from choosing your composting method to troubleshooting common problems and maximizing your results.

Choosing Your Composting Method
Before you start gathering materials, decide which composting method best suits your lifestyle, space, and goals. Different approaches offer distinct advantages, and understanding each will help you make an informed decision.
Hot composting is the fastest method, producing finished compost in 4-8 weeks. This approach requires regular turning and monitoring but yields results quickly. It’s ideal for gardeners with time to dedicate to maintenance and those who want compost for the upcoming growing season. The high temperatures (130-150°F) kill weed seeds and pathogens, making it excellent for disease prevention.
Cold composting is the most passive approach, requiring minimal effort but taking 6-12 months to complete. Simply layer your materials and let nature do the work. This method suits busy gardeners and those with limited space for turning piles. While slower, it’s forgiving and requires less monitoring.
Vermicomposting uses red wiggler worms to break down organic matter, producing nutrient-dense castings. This method works beautifully in apartments, small spaces, or indoors. Worms process food scraps efficiently, and the resulting compost is exceptionally rich in nutrients. Learn more about sustainable gardening practices to complement your vermicomposting setup.
Bokashi composting ferments food waste (including meat and dairy) using specialized microorganisms. This anaerobic method is compact and odor-controlled, making it perfect for urban environments. The fermented material can then be added to traditional compost or buried directly in soil.
Essential Materials and Tools
You don’t need expensive equipment to start composting. Most gardeners find that simple materials work best. Here’s what you’ll need:
- Container or bin: Use a wooden pallet structure, plastic storage bins, or purchase a commercial compost tumbler. A 3x3x3-foot bin is ideal for hot composting.
- Brown materials (carbon): Dry leaves, shredded newspaper, cardboard, straw, wood chips, and sawdust provide carbon and help create airflow.
- Green materials (nitrogen): Food scraps, grass clippings, plant trimmings, coffee grounds, and manure supply nitrogen and moisture.
- Pitchfork or shovel: Essential for turning piles and mixing materials in hot composting systems.
- Thermometer: A compost thermometer helps monitor temperature and indicates decomposition progress.
- Water source: A hose or watering can maintains proper moisture levels.
- Screening tool: A simple screen helps separate finished compost from undecomposed material.
When establishing your system, consider how sustainable energy solutions relate to reducing waste—composting is a zero-energy way to manage organic materials that would otherwise require energy-intensive disposal.
The Carbon-to-Nitrogen Balance
The magic of successful composting lies in balancing carbon-rich “brown” materials with nitrogen-rich “green” materials. This ratio is crucial for optimal decomposition and odor control.
The ideal ratio is approximately 30 parts carbon to 1 part nitrogen by weight, though many gardeners find success with ratios between 25:1 and 35:1. This balance ensures sufficient carbon for energy while providing enough nitrogen for microbial populations to thrive.
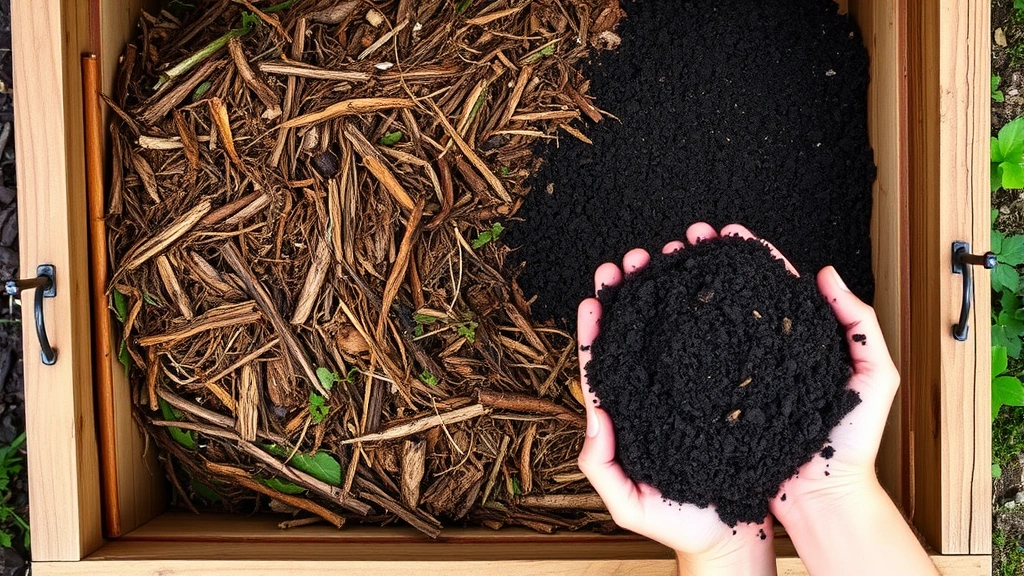
Brown materials (high carbon): These decompose slowly and provide structure. Include dry leaves (excellent source), shredded newspaper and cardboard (avoid glossy paper), wood chips, straw, sawdust, and wood ash. Browns create air pockets essential for aerobic decomposition.
Green materials (high nitrogen): These decompose quickly and provide energy for microorganisms. Include fresh grass clippings, plant trimmings, vegetable scraps, fruit waste, coffee grounds and filters, tea bags, and animal manure (herbivore manure is safer). Greens add moisture and accelerate decomposition.
If your pile smells like ammonia, you have too much nitrogen—add browns. If decomposition slows significantly, you likely need more greens. Monitoring these ratios is the key to a productive system.
Building Your First Compost Pile
Creating your first pile is straightforward. Here’s a step-by-step process for building a hot compost system:
- Choose your location: Select a spot with partial shade, good drainage, and access to water. Avoid direct sunlight, which can dry out the pile too quickly, and wet areas prone to flooding.
- Layer your materials: Start with a 4-6 inch layer of browns (dry leaves, wood chips), then add a 3-4 inch layer of greens (food scraps, grass). Repeat these layers until your bin is full or you’ve used available materials. Finish with a brown layer to minimize odors and pest attraction.
- Moisten the pile: Water each layer as you build. The pile should feel like a wrung-out sponge—moist but not waterlogged. Proper moisture is essential for microbial activity.
- Monitor temperature: Within 24-48 hours, the pile’s center should heat significantly (130°F+). This indicates active decomposition. If it doesn’t heat, you likely need more greens or better moisture.
- Turn regularly: For hot composting, turn the pile every 3-7 days. Move outer material toward the center where decomposition is fastest. This incorporates oxygen and accelerates the process.
Building directly on soil allows beneficial organisms to colonize your pile naturally. If building on concrete, consider adding a layer of soil or finished compost to introduce microorganisms.
Maintenance and Monitoring
Successful composting requires consistent attention to moisture, aeration, and material balance. Regular monitoring prevents problems before they develop.
Moisture management: Your pile should feel like a wrung-out sponge throughout decomposition. If it’s too dry, decomposition slows dramatically. If it’s too wet, anaerobic conditions develop, causing odors and methane production. Check moisture weekly and adjust by adding water or dry browns as needed.
Aeration: Oxygen is essential for efficient aerobic composting. Turning the pile every 3-7 days maintains aeration and accelerates decomposition. If you prefer not to turn, use a compost aerator tool—a long pole with wings that mixes material when twisted. Some gardeners build passive aeration systems using PVC pipes with holes, inserted vertically through the pile.
Temperature tracking: Use a compost thermometer to monitor decomposition. A healthy hot pile reaches 130-150°F. Temperatures above 160°F can kill beneficial organisms; below 120°F indicates slowing decomposition. The pile will naturally cool as materials break down.
Material additions: Continue adding appropriate materials throughout the composting process. However, if you want faster decomposition, stop adding material once you’ve built your initial pile and let it decompose completely before starting a new batch.
Troubleshooting Common Issues
Even experienced gardeners encounter composting challenges. Here’s how to address common problems:
Odor problems: Foul, rotten smells indicate anaerobic conditions (too wet or too compacted, insufficient oxygen). Solution: Add dry browns, turn the pile more frequently, and improve drainage. Ammonia smells indicate excess nitrogen. Solution: Add more brown materials and increase aeration.
Slow decomposition: If your pile isn’t heating or is decomposing very slowly, several factors might be responsible. Check your carbon-to-nitrogen ratio—you may need more greens. Verify moisture levels; add water if too dry. Ensure adequate particle size; large pieces decompose slowly. Consider that cold temperatures naturally slow decomposition in winter.
Pest attraction: Rats, raccoons, and insects are attracted to food scraps. Solution: Bury food waste 8-12 inches deep within the pile and cover with brown materials. Use a bin with a secure lid or hardware cloth bottom. Avoid meat, dairy, and oils.
Matting and compaction: Dense, compacted layers prevent airflow. Solution: Mix in coarser browns like wood chips or straw to improve structure. Turn more frequently to break up compacted areas.
Weeds and seeds: If your pile doesn’t reach hot composting temperatures (130°F+), weed seeds and pathogens survive. Solution: Ensure adequate size (at least 3x3x3 feet) and maintain proper carbon-nitrogen balance to generate heat.
Harvesting and Using Your Compost
Finished compost is dark brown, crumbly, and earthy-smelling. It should look nothing like the original materials. Here’s how to harvest and use your creation:
Timing: Hot composting typically produces finished compost in 4-8 weeks. Cold composting takes 6-12 months. You’ll know it’s ready when you can’t identify original materials and the pile no longer generates heat.
Screening: Use a simple homemade screen (hardware cloth stapled to a wooden frame) to separate finished compost from larger undecomposed pieces. Return larger pieces to your next compost pile.
Storage: Store finished compost in bins or bags in a cool, dry location. It can be kept indefinitely, though nutrients gradually leach out. Use within 6-12 months for maximum nutrient availability.
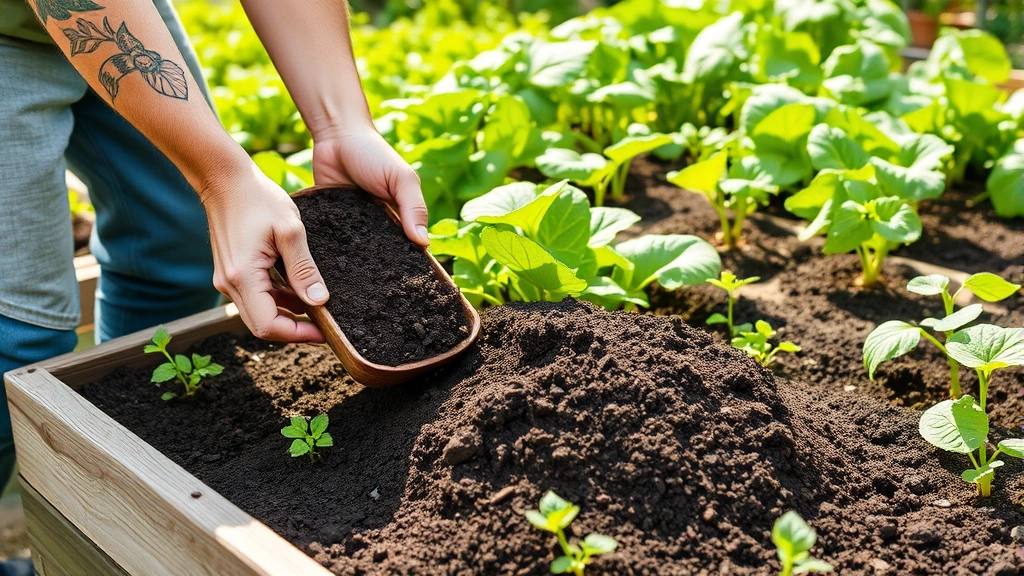
Application: Mix finished compost into garden beds at 2-4 inches deep. Use as a mulch around plants, blend into potting soil (1 part compost to 2 parts soil), or make compost tea by steeping finished compost in water. Compost improves soil structure, water retention, and nutrient availability while reducing fertilizer needs.
Understanding how to manage resources efficiently extends to gardening—composting eliminates the need to purchase fertilizers and soil amendments, reducing consumption and expense. For those interested in broader sustainability, explore fuel-efficient vehicles and electric vehicle benefits as complementary lifestyle changes.
FAQ
Can I compost cooked food?
Cooked food can be composted but requires caution. It decomposes more slowly than raw food and may attract pests. Bury cooked food deep within the pile, cover thoroughly with browns, and ensure your pile reaches hot composting temperatures. Avoid cooked meat, dairy, and oils.
What about diseased plants and weeds with seeds?
Diseased plants can be composted if your pile reaches 130°F+ consistently, killing pathogens. Weeds with seeds require the same temperature threshold. If you’re unsure your pile will get hot enough, dispose of these materials separately.
How often should I turn my compost pile?
For hot composting, turn every 3-7 days for fastest results. Less frequent turning (every 2-3 weeks) still works but extends the timeline. Cold composting requires no turning. Choose based on your available time and desired timeline.
Can I use compost from diseased plants in my vegetable garden?
Only if your pile reached 130°F+ for sustained periods. Otherwise, avoid using it on edible crops to prevent pathogen transmission. It’s safe for ornamental plants regardless.
What’s the best compost bin for apartments?
Vermicomposting bins and bokashi buckets work excellently in apartments. Both are compact, odor-controlled, and don’t require outdoor space. Worm bins produce nutrient-rich castings; bokashi ferments food waste quickly.
Can I compost sawdust and wood chips?
Yes, untreated sawdust and wood chips are excellent browns. Avoid treated wood (contains harmful chemicals). Hardwood sawdust decomposes faster than softwood. Use in moderation as they’re very carbon-rich and decompose slowly.
How do I prevent my compost from becoming too wet?
Ensure good drainage by building on soil rather than concrete. Add coarser browns like wood chips for structure. Cover your pile during heavy rain. Turn frequently to incorporate moisture. If waterlogged, add dry browns and improve aeration.