Fix Your Gas Gauge? Expert Mechanics Guide to Diagnosing and Repairing Fuel Level Issues
A malfunctioning gas gauge can be more than just an inconvenience—it’s a safety concern that can leave you stranded on the road without warning. Whether your fuel gauge reads empty when your tank is full, stuck at one position, or fluctuating erratically, understanding the root cause is essential for proper repair. This comprehensive guide walks you through the diagnostic process, common culprits, and actionable solutions to get your fuel monitoring system back on track.
As vehicles become more sophisticated, fuel gauge systems rely on complex electronic components and sensors working in harmony. When one element fails, the entire system can malfunction. This guide covers everything a vehicle owner or aspiring mechanic needs to know about troubleshooting and fixing gas gauge problems, from simple fixes to more complex electrical diagnostics.

Understanding Your Fuel Gauge System
The fuel gauge system is a sophisticated network of components designed to monitor your vehicle’s fuel level accurately and relay that information to the driver. At its core, the system consists of three main parts: the fuel tank sender unit, the instrument cluster gauge, and the wiring and electrical connections that link them together.
The fuel sender unit, also called a fuel level sensor, sits inside your fuel tank and uses a float mechanism to detect fuel levels. As fuel fills the tank, the float rises; as fuel depletes, it falls. This mechanical movement is converted into an electrical signal that travels through dedicated wiring to your instrument cluster. The gauge then interprets this signal and displays your current fuel level on the dashboard.
Understanding this basic architecture helps explain why natural gas and alternative fuels require different gauge systems—they operate on similar principles but with fuel-specific sender units calibrated for their unique properties. Modern vehicles also include redundancy in their fuel monitoring systems, with some cars featuring multiple sensors or backup fuel level indicators that activate if the primary system fails.
The electrical resistance in the sender unit changes as the float moves, typically ranging from 0 to 90 ohms (or sometimes 0 to 240 ohms, depending on manufacturer specifications). The gauge on your dashboard is designed to respond to these resistance changes and display the appropriate fuel level. Any disruption in this electrical pathway—whether from corrosion, broken wiring, or a faulty sender—will result in inaccurate readings.
Common Symptoms of a Faulty Gas Gauge
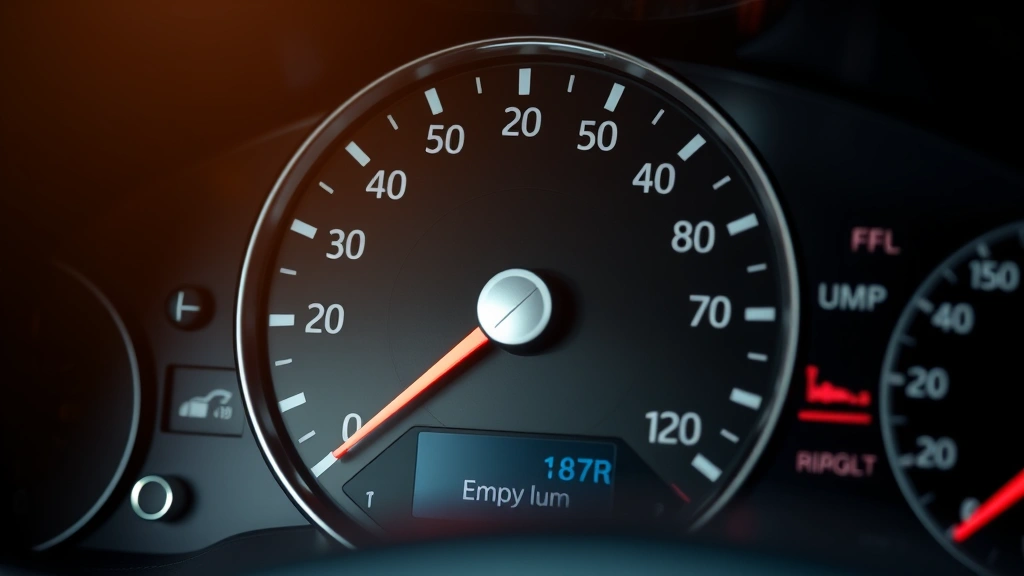
Recognizing the warning signs of a failing fuel gauge system allows you to address the problem before it becomes dangerous. The most obvious symptom is an inaccurate reading—your gauge shows a different fuel level than what you actually have. Some drivers notice their gauge reads “Full” constantly, while others experience the opposite with a gauge stuck on “Empty.”
Erratic behavior is another telltale sign. Your fuel gauge might jump between readings unpredictably, fluctuate when you accelerate or brake, or behave differently depending on how full your tank is. Some vehicles exhibit a lag between actual fuel consumption and gauge response, where the needle moves several minutes after you’ve started driving.
Additional symptoms include:
- Gauge not responding at all when you turn on the ignition
- Intermittent operation where the gauge works sometimes but not others
- Gauge moving slowly to respond to fuel level changes
- Check engine light appearing alongside fuel gauge problems
- Fuel pump noises or electrical buzzing from the fuel tank area
The severity and nature of symptoms often indicate which component is failing. A completely stuck gauge typically points to a sender unit problem, while erratic behavior might suggest electrical connection issues or a failing instrument cluster. Intermittent problems are particularly frustrating because they make diagnosis more challenging.
Diagnostic Steps for Gas Gauge Problems
Before you start replacing expensive components, follow a systematic diagnostic approach to identify the actual problem. Start with the simplest checks and progress to more complex testing.
Step 1: Visual Inspection
Open your fuel door and inspect the fuel cap. A loose or damaged cap can occasionally cause fuel gauge errors, particularly in older vehicles. Ensure it’s properly sealed. Next, check your vehicle’s battery voltage—a weak battery can cause gauge fluctuations. A fully charged battery should read 12.6 volts or higher when the engine is off.
Step 2: Check Fuses and Relays
Consult your vehicle’s manual to locate the fuel gauge fuse and fuel pump relay. A blown fuse will completely disable the gauge, while a faulty relay might cause intermittent operation. Replace any blown fuses and test the relay by listening for a clicking sound when you turn the ignition on.
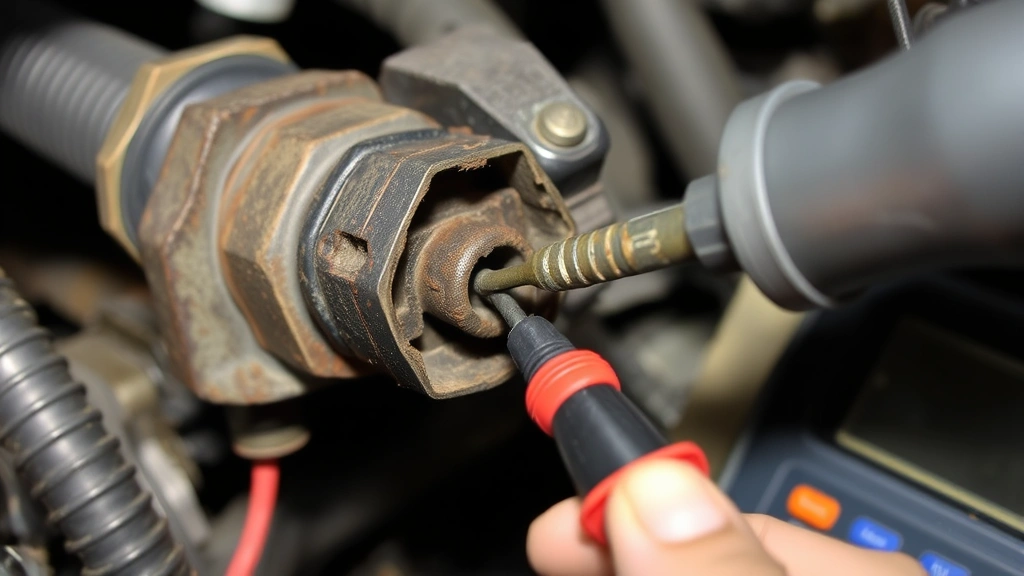
Step 3: Test the Sender Unit
This requires accessing your fuel tank, which is more involved but essential for accurate diagnosis. Disconnect the sender unit wiring and use a multimeter set to ohms to measure resistance. With the fuel tank empty, you should read approximately 90 ohms (or your vehicle’s specified “Empty” resistance). With the tank full, resistance should drop to around 0-10 ohms (or your vehicle’s “Full” specification). If readings don’t match these ranges, your sender unit is faulty.
Step 4: Inspect Wiring and Connections
Check all wiring between the fuel tank and instrument cluster for corrosion, damage, or loose connections. Pay special attention to the fuel tank ground wire, which is critical for proper operation. Corroded connectors are a common culprit in fuel gauge failures. Clean any corroded connections with electrical contact cleaner and apply dielectric grease to prevent future corrosion.
Step 5: Test the Instrument Cluster
If the sender unit tests normal but your gauge still malfunctions, the problem likely lies in the instrument cluster itself. This requires more advanced testing, often involving specialized diagnostic equipment or professional help.
Fuel Sender Unit Failures
The fuel sender unit is the most common component to fail in a gas gauge system. Located inside your fuel tank, it’s exposed to fuel, moisture, and temperature fluctuations that accelerate wear over time. Most sender units last between 150,000 and 200,000 miles, though this varies by vehicle quality and driving conditions.
Sender unit failures typically occur due to:
- Float mechanism corrosion causing it to stick in one position
- Electrical contact degradation where the resistor element wears out
- Mechanical damage from debris in the fuel tank
- Water contamination in the fuel tank causing internal corrosion
- Fuel pump interference in combined fuel pump/sender assemblies
Replacing a fuel sender unit requires dropping the fuel tank, which is labor-intensive work. If your tank is more than half full, you’ll need to siphon fuel first. Many mechanics recommend replacing the fuel pump and filter at the same time, since you’re already inside the tank. When selecting a replacement sender unit, ensure you purchase the correct specification for your vehicle—resistance values and connector types vary significantly between manufacturers.
The cost of fuel sender unit replacement ranges from $200 to $800 depending on your vehicle, with labor typically comprising 50-70% of the total expense. Some vehicles have sender units accessible through the trunk or cabin, making replacement simpler and less expensive. Always consult your specific vehicle’s repair manual before attempting this repair.
Electrical and Wiring Issues
Electrical problems account for approximately 30% of gas gauge failures. The fuel gauge circuit is relatively simple, but any break in the electrical pathway will cause malfunction. Common electrical issues include corroded connectors, damaged wiring harnesses, and poor ground connections.
Ground wire problems are particularly insidious because they’re often overlooked. The sender unit relies on a solid ground connection to complete the electrical circuit. If the ground wire is corroded, loose, or damaged, the gauge won’t function properly even if the sender unit is fine. Inspect the ground wire connection at the fuel tank and follow it to the chassis ground point, ensuring both connections are clean and tight.
Corroded connectors are another frequent culprit. Moisture and road salt can penetrate electrical connectors, creating resistance that interferes with signal transmission. If you notice your gauge working intermittently or behaving erratically, particularly after exposure to moisture or salt, suspect connector corrosion. Disconnect the connector, clean both male and female terminals with electrical contact cleaner, and apply a thin layer of dielectric grease before reconnecting.
Damaged wiring from accidents, rodents, or improper installation can also disrupt gauge operation. Trace the wiring harness from the fuel tank to the instrument cluster, looking for pinches, cuts, or exposed copper. If you find damaged wiring, the affected section should be repaired or the entire harness replaced. Soldering damaged wires is a temporary fix at best; professional-grade repairs involve splicing with proper connectors and heat shrink tubing.
For vehicles running on sustainable energy solutions or alternative fuels, electrical systems may include additional complexity. Electric vehicle fuel monitoring systems operate on entirely different principles, with battery management systems replacing traditional fuel sender units.
Instrument Cluster Problems
When the sender unit tests normal and wiring is intact, the problem likely resides in the instrument cluster itself. The gauge is an electromechanical or electronic component that interprets electrical signals from the sender unit and displays fuel level information. Modern vehicles increasingly use digital displays instead of mechanical gauges, which introduces different failure modes.
Mechanical gauge failures typically result from internal component wear, broken needle mechanisms, or loss of calibration. Electronic gauge failures might involve failed circuits, corroded solder joints, or software glitches in the instrument cluster computer. Testing an instrument cluster requires specialized equipment and technical knowledge beyond most DIY mechanics’ capabilities.
If you suspect an instrument cluster problem, your best option is professional diagnosis. Many independent shops and dealerships can test the cluster using specialized equipment. If the cluster is confirmed faulty, repair options include replacing the entire cluster (expensive), having it professionally repaired (moderate cost), or in some cases, reprogramming it if the issue is software-related.
Some clusters can be removed and sent to specialized repair facilities that rebuild failed components. This option is often cheaper than buying a new cluster but takes longer. Always verify that cluster repair facilities can work with your specific vehicle before committing to this route.
DIY Repairs vs Professional Help
Deciding whether to tackle gas gauge repairs yourself depends on your mechanical skill level, available tools, and the specific problem. Some repairs are genuinely DIY-friendly; others require professional expertise and equipment.
DIY-Friendly Repairs:
- Replacing blown fuses
- Cleaning corroded connectors
- Tightening loose wiring connections
- Testing sender unit resistance with a multimeter
- Inspecting wiring for visible damage
Repairs Requiring Professional Help:
- Fuel tank removal and sender unit replacement
- Instrument cluster repair or replacement
- Complex electrical diagnostics with specialized equipment
- Fuel pump replacement (often combined with sender unit work)
- Wiring harness repair in safety-critical circuits
Fuel tank removal is particularly challenging because it requires safely draining fuel, disconnecting multiple components, and using proper lifting equipment. Mistakes during this process can result in fuel spills, electrical hazards, or personal injury. If diagnosis points to a fuel sender unit problem, professional replacement is recommended unless you have specific experience with fuel system work.
The cost difference between DIY and professional repair varies significantly. A simple connector cleaning might save $100-200 in labor, while attempting a fuel sender unit replacement yourself could cost significantly if something goes wrong. Weigh the potential savings against the risks and your comfort level before deciding.
Preventive Maintenance Tips
Extending the life of your fuel gauge system involves regular maintenance and preventive care. These practices reduce the likelihood of failures and catch problems early before they become dangerous.
Regular Fuel System Inspections
During routine vehicle maintenance, have your mechanic visually inspect fuel system components for corrosion or damage. Early detection of problems allows for proactive repairs before complete failure occurs.
Use Quality Fuel
Fuel quality significantly impacts fuel system longevity. Premium fuel from reputable stations contains better detergents and fewer contaminants that could damage the sender unit. Avoid sketchy gas stations with poor maintenance records.
Keep Your Tank Clean
Debris in your fuel tank can damage the sender unit’s float mechanism. If you suspect tank contamination, have it professionally cleaned. Never run your vehicle completely out of fuel, as this can stir up sediment and stress the fuel pump and sender unit.
Protect Electrical Connections
Apply dielectric grease to all fuel system electrical connectors during maintenance. This simple step prevents moisture and corrosion from compromising connections. Check connections annually, especially in humid or salt-spray environments.
Monitor Battery Health
A weak or failing battery can cause gauge fluctuations. Maintain proper battery voltage and replace the battery if it’s more than three years old or showing signs of weakness.
Address Issues Promptly
Don’t ignore fuel gauge inconsistencies. Early diagnosis often reveals simple problems like loose connections rather than expensive component failures. Addressing issues immediately prevents cascading failures in related systems.
For vehicle owners exploring alternative fuel options or considering green technology innovations for transportation, understanding traditional fuel systems provides valuable context for comparing different vehicle technologies and their maintenance requirements.
FAQ
How much does it cost to fix a gas gauge?
Gas gauge repair costs range from $150 to $800 depending on the underlying problem. Simple fixes like replacing blown fuses or cleaning corroded connectors cost $100-200. Fuel sender unit replacement typically costs $300-600, while instrument cluster repair or replacement can exceed $800. Labor costs vary significantly by location and mechanic.
Can a bad battery cause gas gauge problems?
Yes, a weak or failing battery can cause fuel gauge fluctuations or erratic behavior. The fuel gauge circuit requires stable voltage to function properly. If your battery voltage drops below 12 volts, the gauge may not display accurately. Test your battery voltage and replace it if necessary.
Why does my gas gauge jump around?
Erratic gauge behavior typically indicates a failing fuel sender unit, poor electrical connections, or a malfunctioning instrument cluster. Corrosion at connector points is a common cause of jumping gauges. Start by cleaning electrical connections and testing the sender unit resistance.
Is it safe to drive with a broken gas gauge?
Driving with a non-functional gas gauge is risky because you might run out of fuel unexpectedly. However, you can manage this risk by tracking mileage and refueling based on a schedule. Still, you should have the gauge repaired as soon as practical for safety and convenience.
How long does fuel sender unit replacement take?
Professional fuel sender unit replacement typically takes 2-4 hours depending on vehicle accessibility and complexity. Some vehicles have sender units accessible from the trunk, requiring only 1-2 hours. Others require complete fuel tank removal, extending the job to 4-6 hours.
Can I replace just the float in the sender unit?
In some cases, you might replace just the float mechanism if it’s corroded or stuck. However, most mechanics recommend replacing the entire sender unit assembly because internal components are often integrated. Individual component replacement is rarely economical.
What does a fuel gauge test with a multimeter involve?
Disconnect the fuel sender unit and set your multimeter to ohms. Check resistance with the tank empty (should read ~90 ohms) and full (should read ~0-10 ohms). If readings don’t match your vehicle’s specifications, the sender unit is faulty.